
Browse Articles
Select a Product
null Support Directory
Browse all null articles. (Last Updated
No articles found.
Search Results
No articles found.
Articulate 360 AI and Frontline: Creating AI Avatars
Article Last Updated Oct 23, 2026
This article applies to:
Storyboarding, filming, and editing presenter videos is time-consuming and labor-intensive. Worse yet, the moment your content changes, your video is already out of date. AI Avatars turns a script into a polished, custom presenter-style video—no camera, no editing software, and no reshoots when something changes. Read on to learn how it works.
- Understand AI Avatars
- Access AI Avatars
- Create AI Avatars
- Remove Video Watermarks from Trial Content
- Get Tips for Better Results
- FAQs
Understand AI Avatars
AI Avatars is a Nova-powered feature that works best for short, custom presenter-style videos. Lesson introductions, transitions, and key takeaways can all benefit from a consistent voice and presence to guide learners through content.
Create your own character or choose from a library of photorealistic and illustrated characters. You can filter by style, gender, age, or environment and customize your chosen character through a simple chat interface. Videos can be up to five minutes long.
Note: Generating an AI avatar video consumes the credits that fuel all Nova capabilities. The number of credits consumed depends on your video's length. (Learn how credits work.)
Access AI Avatars
Every avatar video follows the same four-step workflow: select a character, choose a voice, add your script, and generate. The process is identical everywhere—only your starting point changes, depending on which product or tool you're creating in.
Rise 360
- Go to a lesson in your Rise 360 course
- Click the Block Library in the shortcuts bar at the bottom. This opens the block library as a sidebar menu on the left.
- Click AI blocks > Generate AI avatar to open the AI Avatars workspace.
Custom Block in Rise 360
- Insert or edit a custom block in your Rise 360 course.
- Do either of these in the left sidebar to open the AI Avatars workspace directly in the custom block editor:
- Select AI, then click Generate AI avatar, or
- Click Video.
Interactive Blocks in Rise 360
- Hover over an interactive block in your Rise 360 course.
- Click Content (pencil icon) in the left-floating toolbar.
- Click Add image or video (image icon), then select Create with AI Avatar. If there’s existing media, click Replace > Create AI avatar video.
Supported interactive blocks include:
- Accordion
- Tabs
- Labelled Graphic
- Process
- Timeline
- Knowledge Checks
Storyline 360
- Open your Storyline 360 project.
- Switch to Slide View.
- Go to the Home or Insert tab on the ribbon.
- Click the Insert Avatar icon to open the Generate AI Avatar window.
- If available, click the Insert Avatar icon in a content, character, or video placeholder.
Frontline Quick Reference
- Go to a lesson in your quick reference.
- Click the Block Library in the shortcuts bar at the bottom. This opens the block library as a sidebar menu on the left.
- Click AI blocks > Generate AI avatar to open the AI Avatars workspace.
Generating an avatar video for the quick reference format consumes additional credits beyond those used to generate the kit that includes the quick reference.
Create AI Avatars
You can either select a character to use as-is from the character library, create one of your own, or upload an image file. Whichever you use, you can customize it to fit your needs.
Select a Character
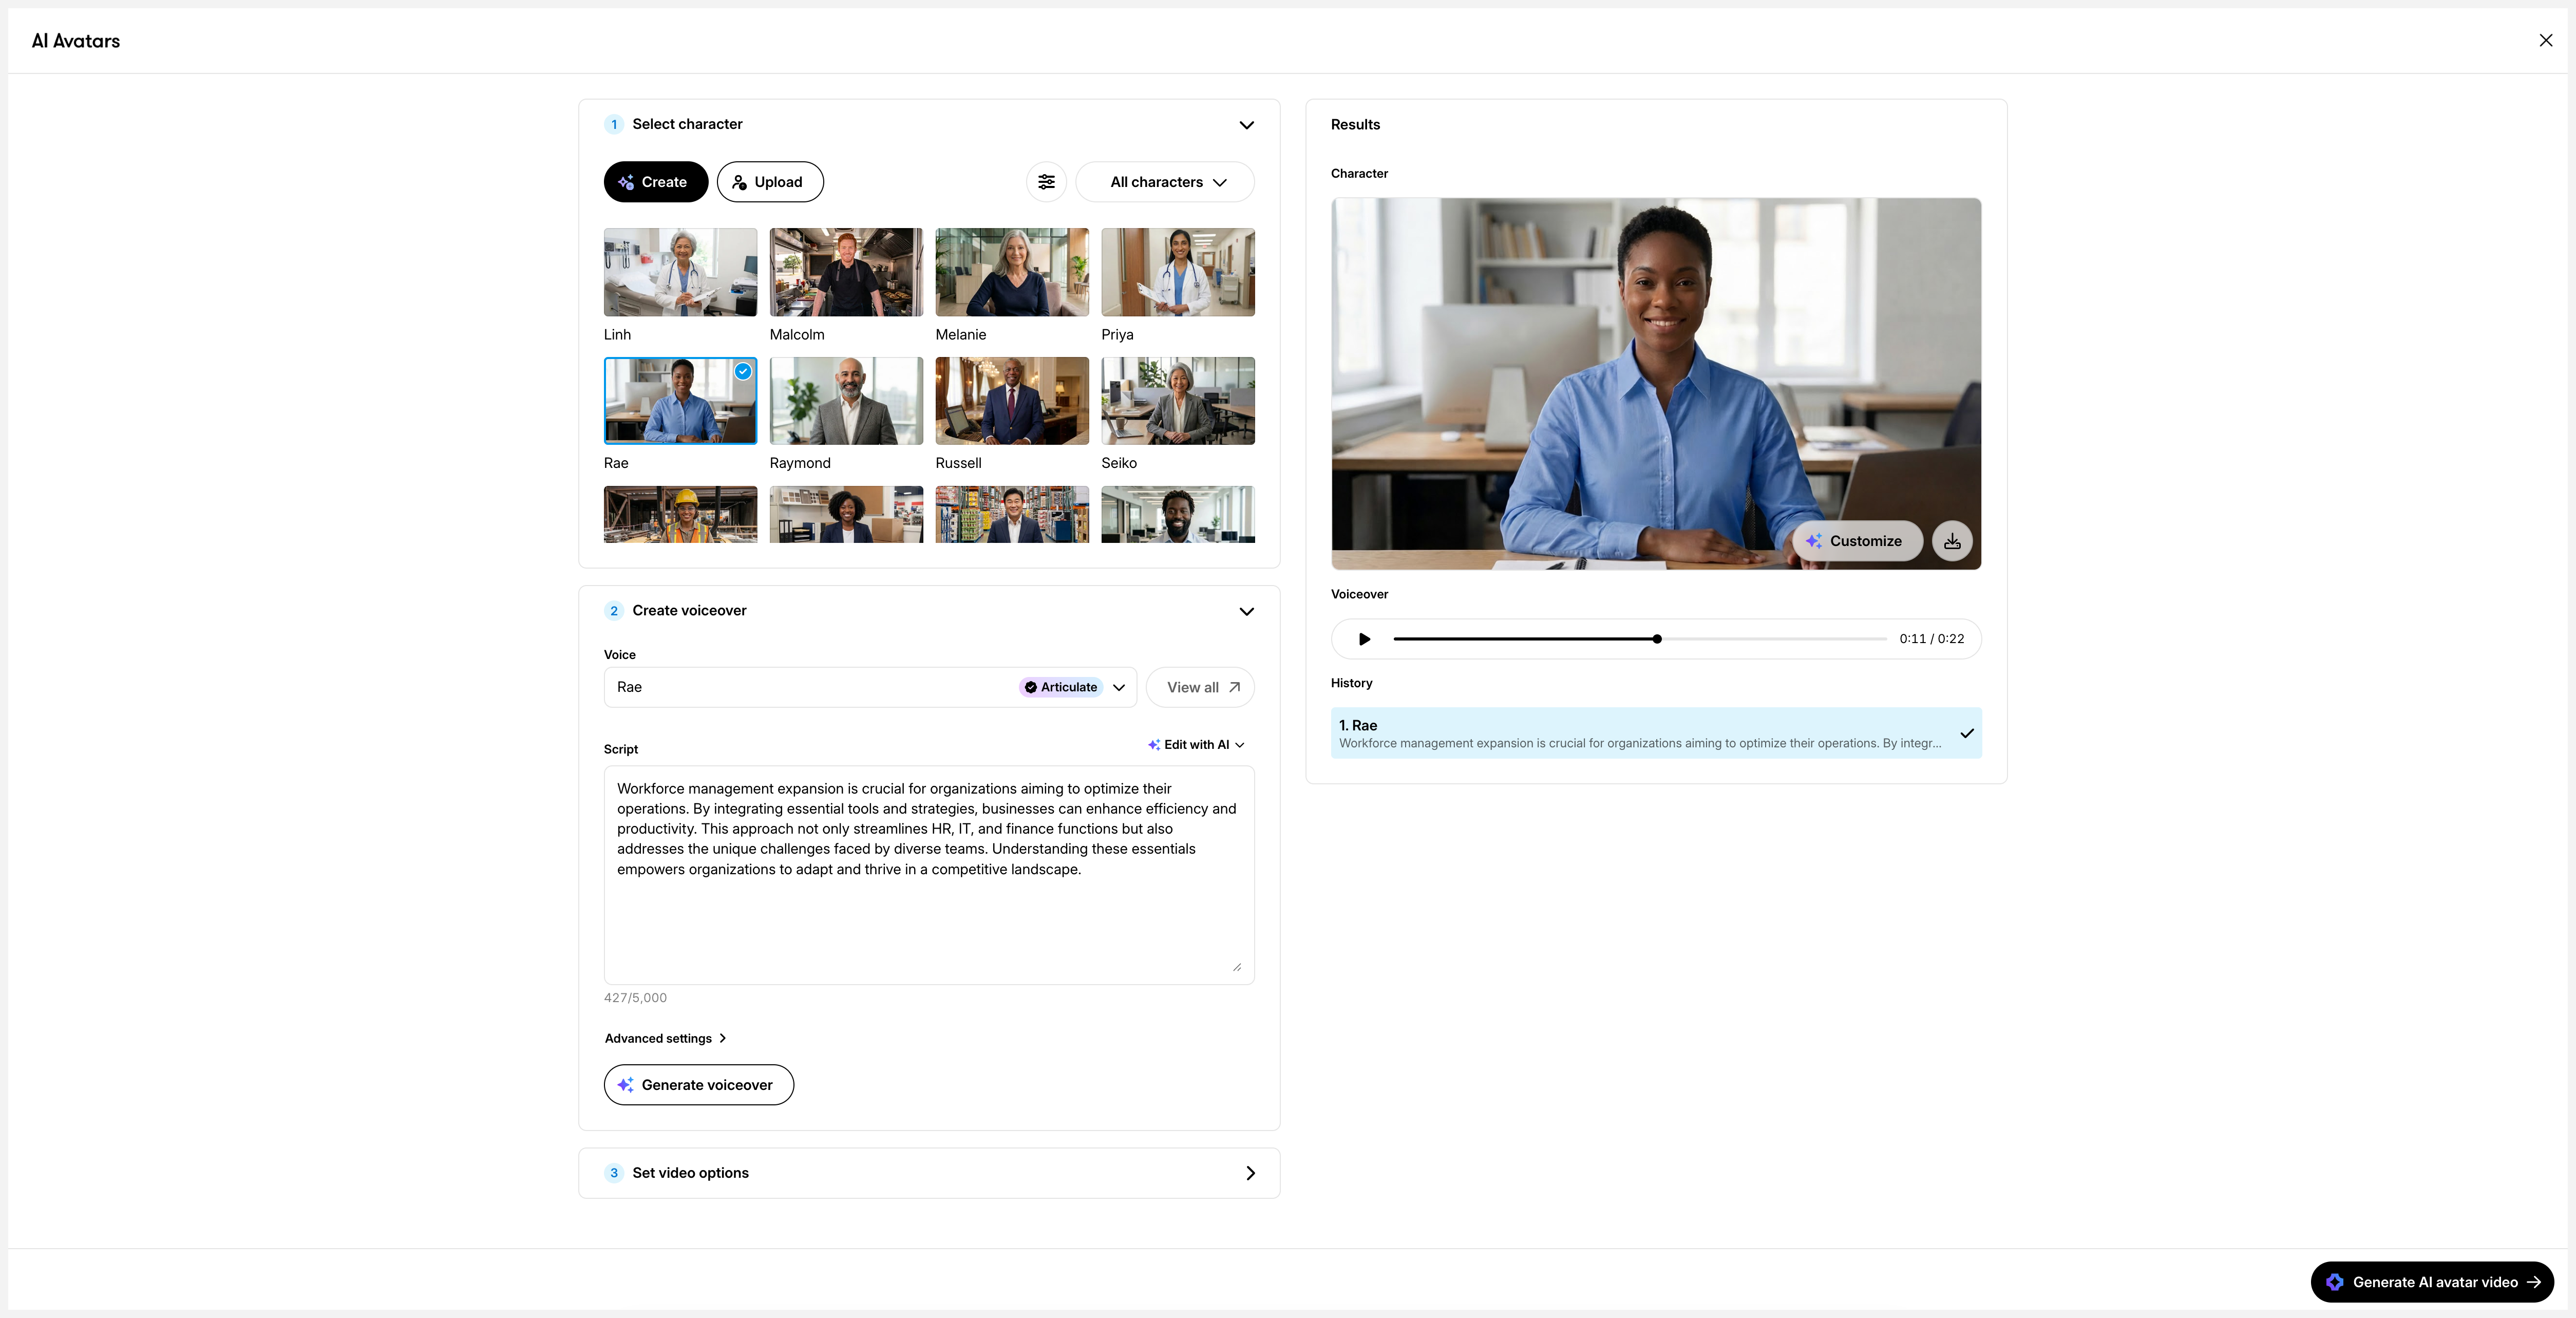
- Choose a character from the Stock characters section within the Select character panel. Scroll down the gallery to discover more ready-to-use characters.
- Use the dropdown button in the upper-right corner to show only Saved or Stock characters. The default is All characters.
- Use Filters (sliders icon) to find specific characters. The available filter options include:
- Style: Photorealistic, Illustrated
- Gender: Female, Male, Non-binary
- Age: Young adult, Adult, Older adult
- Environment: Office, Medical, Construction, Industry
- See your currently selected character in the Results panel on the right. From here you can:
- Download the character by clicking the Download icon. (Characters download in PNG format.)
- Edit your character by clicking the Customize button.
When you select a character, the Create voiceover panel will expand automatically.
Create a Character
To create a new character, click the Create button within the Create character panel. This opens the character customization interface.
Enter your prompt in the chat box to describe the character you want. Include as much detail as possible—for example, your desired character’s role or job, clothing, or setting, and the overall visual tone.
Enhance Prompt with AI
AI can help you turn simple character prompts into richer, more detailed descriptions. For example, if you start with a basic prompt like “A doctor,” you can click the Prompt assist button (sparkle icon) in the lower-right corner of the chat box, then click the Enhance with AI button in the pop-up menu. AI expands your prompt with details such as clothing, pose, expression, lighting, and background.
You can enhance prompts when creating a new character or editing an existing one.
Use Reference Images
Reference images are used to guide character generation. Sharing your own visual assets helps Nova create characters that better match your brand style, environment, and visual identity. Here's how:
- Click the Attach button (paperclip icon) in the lower-left below the chat box.
- Upload up to four reference files by clicking their corresponding tiles:
- Character: Upload an image of a person or character.
- Background: Upload an image of a scene or environment.
- Logo: Upload an image of your company or brand logo.
- Additional image: Upload any additional reference image.
- (Optional) To replace or delete a reference image, hover over it and click the Replace or Delete icon.
You can also choose from prebuilt prompts for style, framing, presentation, pose, environment, clothing, and expression. Click the Prompt assist button, then select a prebuilt prompt under Quick prompts.
If you use a reference image of a real person to create a custom character (a Custom Photorealistic Avatar), our Custom Photorealistic Avatar Terms apply.
Use Styles
You can create character images that match your training content with styles. Here’s how:
- Click Style (palette icon) in the lower-left corner of the chat box.
- Select a prebuilt style from the list, then click Apply.
- (Optional) Choose Custom to create a style with your own prompts or a prompt copied from a prebuilt style.
Edit Generated Character
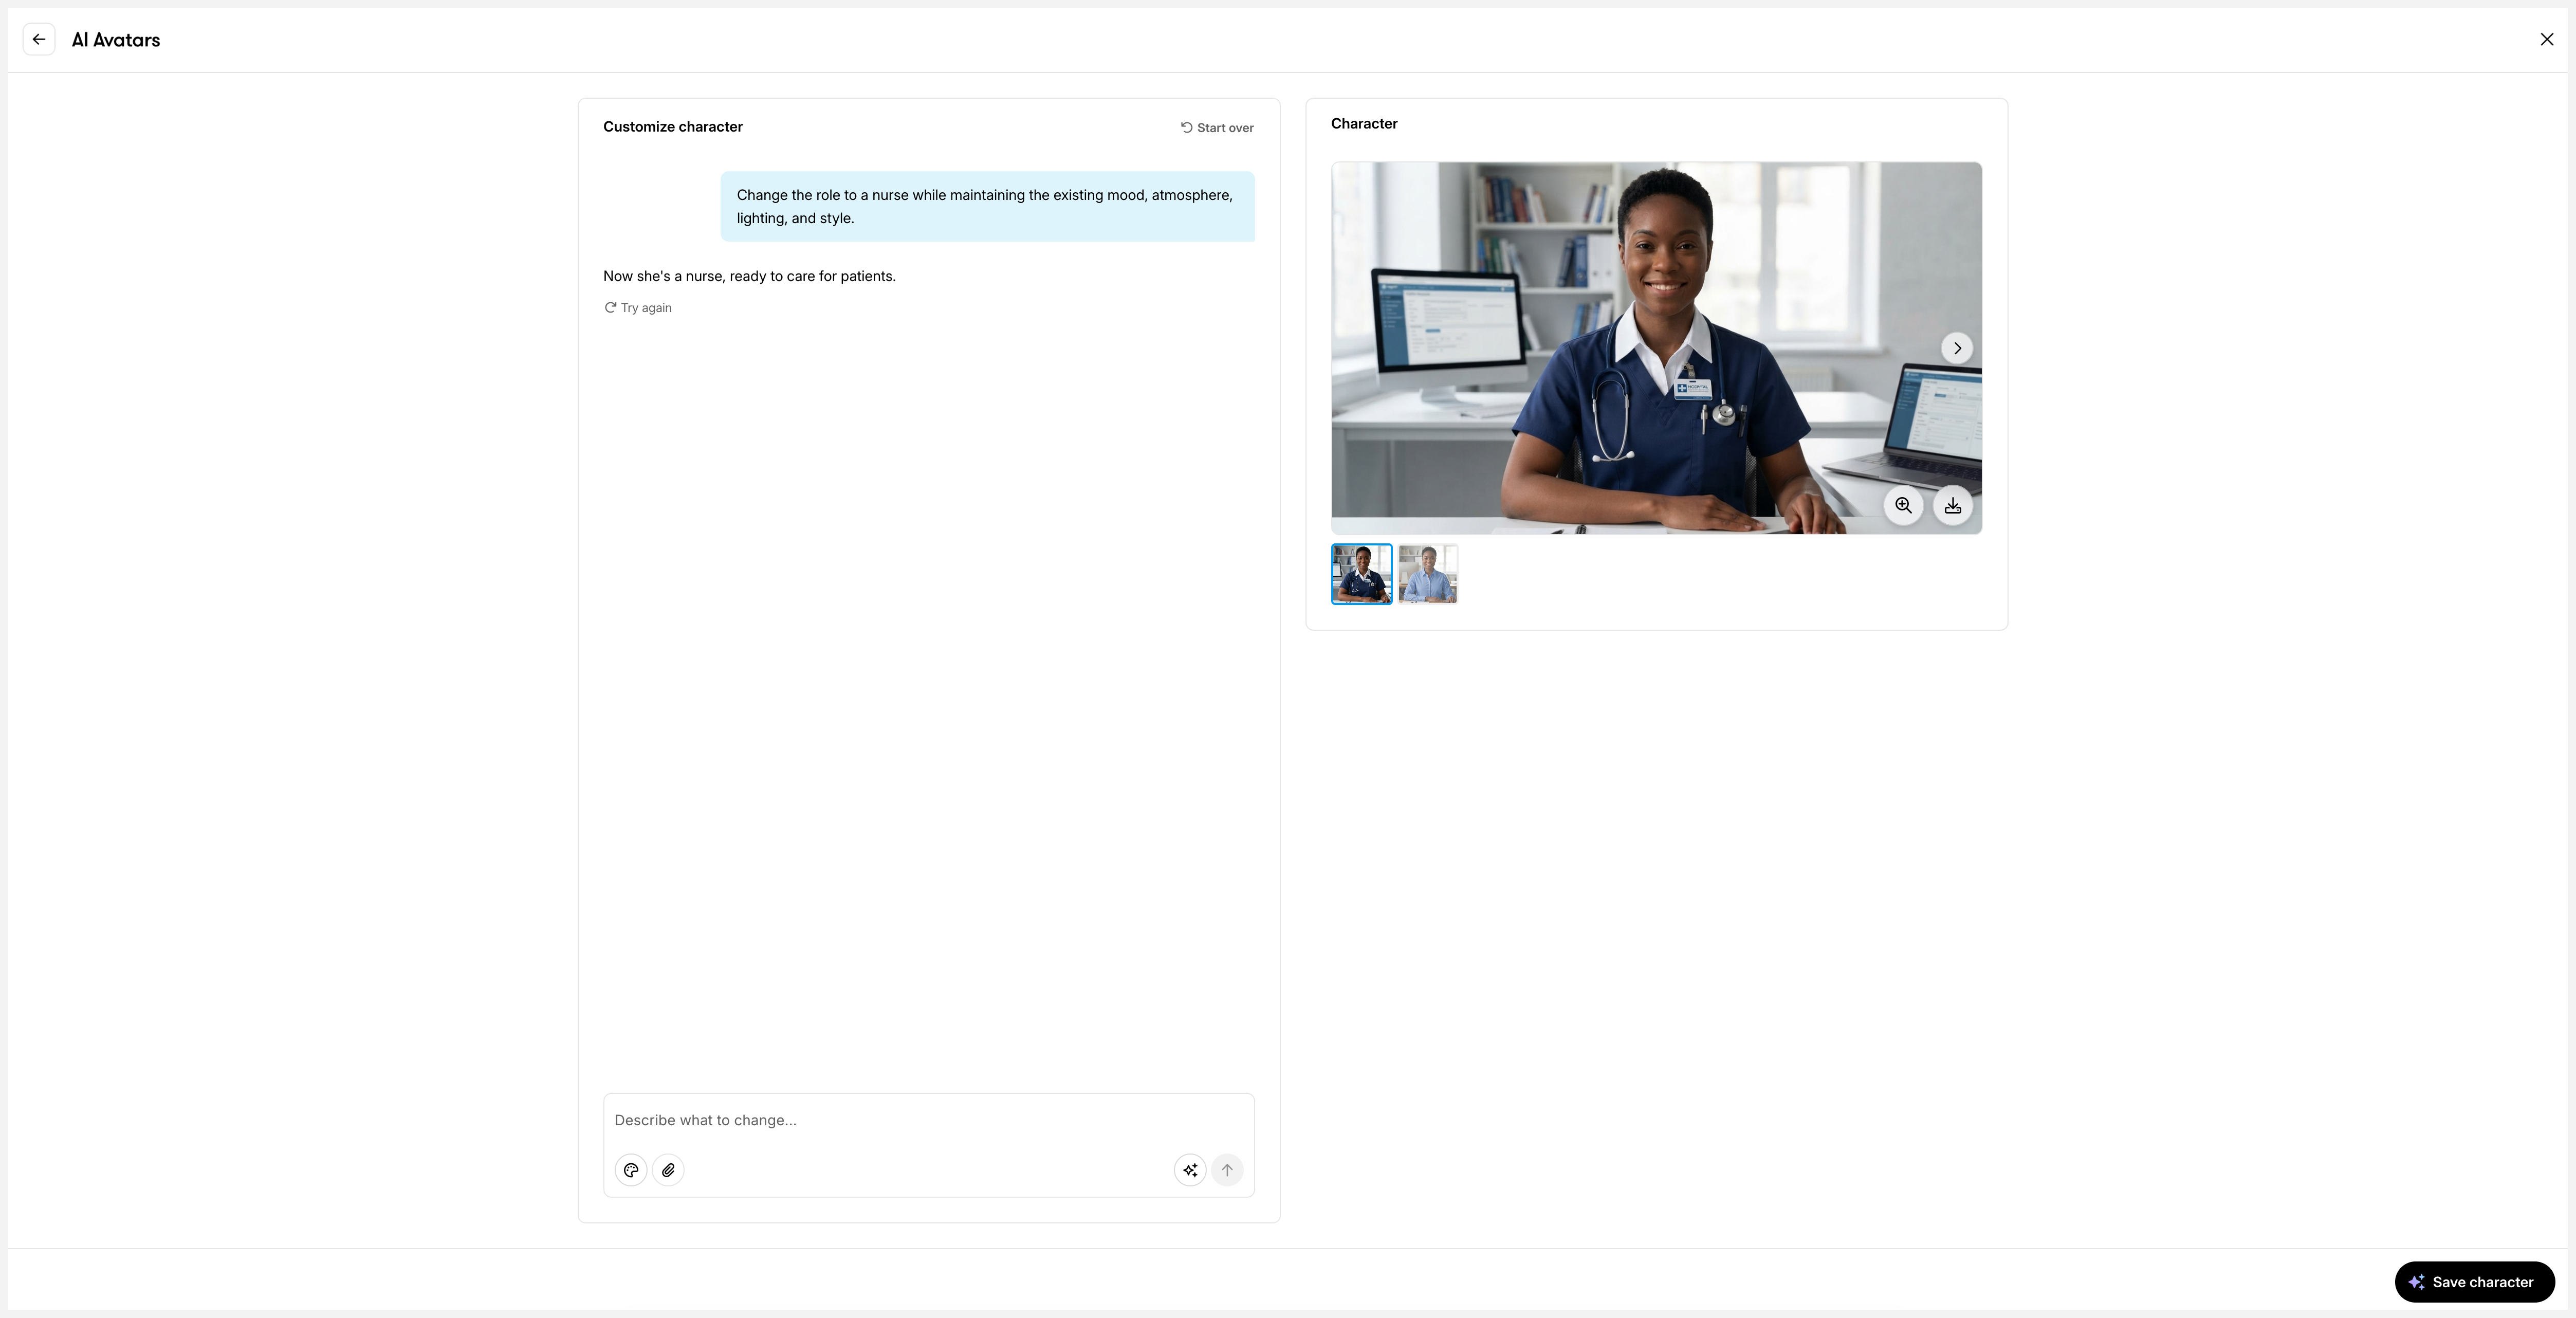
Enter follow-up prompts to edit your generated character. Use the Try again link under each response to regenerate an image with the last prompt. To start over from scratch, click the Start over link in the upper-right corner. This will delete all prompts and the results already generated.
As you iterate, new versions appear in the preview panel. Use the filmstrip below the image or the arrows on either side of the image to switch between versions and compare results. Click the Expand image (magnifying glass with plus sign) icon in the lower-right corner to see a larger preview of the image. To download the generated image, click the Download icon.
When you’re ready, select a version and click Save character. Enter a name, then click Save character. Your character will appear under the Saved characters section. If you leave without saving, your changes will be lost.
To rename or delete a saved character, hover over it, click the three-dot menu in the upper-right corner, then choose Rename or Delete.
Upload a Character
- Click the Upload button or drag and drop an image file into the Select character panel.
- Select an image file from your computer if you clicked the Upload button.
- Supported image file formats include JPG, PNG, and WEBP, up to 10 MB.
- Crop the image to your preference, then click Save.
- Enter a name for your character, then click Save character.
The uploaded character appears in the Saved characters section.
If you use a reference image of a real person to create a custom character (a Custom Photorealistic Avatar), our Custom Photorealistic Avatar Terms apply.
Customize a Character
Customize your selected character by clicking the Customize button in the lower-right corner of the character preview. This opens the character customization interface, where you can do things like:
- Change the background or setting
- Update clothing or appearance
- Modify the character’s pose
- Add or remove elements
Add Character Voice
Use the audio selection panel to generate text-to-speech audio for your character. If you’ve used AI text-to-speech in Rise 360 or Storyline 360 before, this experience will feel familiar.
To choose a voice and create your audio, follow these steps:
- Select a voice from the dropdown menu.
- If you’re using a character from the stock library, a recommended voice is selected by default. Photographic stock characters come with Articulate Voices, which are only available in Articulate.
- Open the dropdown to explore other voices.
- Click the play button to preview a voice.
- Click View all next to the dropdown to browse the full voice library.
- Add your script.
- Enter your script in the text box.
- To generate a script, click Write with AI and enter a prompt or choose from prebuilt options.
- Scripts can be up to 5,000 characters long.
- (Optional) Configure advanced settings.
- Click Advanced settings to choose a voice model or make further adjustments.
- Generate speech.
- Click Generate voiceover to create the voiceover.
- Each version is saved in the History list on the right, below the character preview, for easy comparison.
- Use the static preview to check how the voice pairs with your character.
Set Video Options
AI avatar videos are compressed by default to preserve quality while optimizing file sizes for web distribution. To generate the highest-quality output, check the Optimize for LMS compatibility box in the Set video options panel. High-quality videos produce larger file sizes, which some Learning Management Systems (LMS) may not support.
Closed captions are automatically generated for AI avatar videos. To exclude closed captions, uncheck the Generate captions with AI box.
Generate Avatar Video
When you’re satisfied with the character and voice pairing, select both and then click Generate AI avatar video in the bottom right to create the avatar video.
You’ll see a placeholder block while Nova generates your video. A progress bar will also appear below it. You may continue working while this is in progress.
To edit your video, hover over the block, click Content, then click the Replace with AI Avatar icon in the sidebar menu. This will reopen the AI Avatars workspace, allowing you to update the character, voice, or script.
To download your avatar video, click the play button, then click the Download icon that appears in the lower-right corner when playback starts.
Remove Video Watermarks from Trial Content
Avatar videos you generate on a trial subscription include a watermark. Once you convert to a paid subscription or are added to one, Articulate automatically removes the watermark.
Note that this only removes the watermark from the original copy of your avatar video. If you shared a watermarked video outside the original training content before converting, that copy will remain watermarked.
In Storyline 360, you need to close and reopen your project for the change to take effect. Published courses will also need to be republished.
Get Tips for Better Results
The following tips will help you get better, more consistent results when creating
AI avatar videos:
- Keep content simple. Focus on videos that work well with a single narrator, such as introductions, transitions, and key takeaways.
- Keep videos short. Videos can be up to five minutes long, but shorter presenter videos (less than two minutes) produce the best results.
- Make prompts clear and specific. Describe exactly what you want, including details like the character’s role, appearance, and environment.
- Focus on one idea at a time. Break longer content into individual avatar videos, each delivering a single message.
Understanding the following known limitations can help you get more predictable results:
- You can't directly prompt the video. Nova generates your video from the character image and voiceover you provide, so those are the only inputs you control.
- Only one speaker is supported per video. Multiple characters can appear in the frame, but only one can speak.
- You may notice occasional variations in framing and continuity. Subtle zoom or color shifts and side glances may sometimes appear in the video.
- Emotion in the voiceover may carry over into the video. A character’s voice, tone, volume, and even facial expression may change if you include certain punctuation, especially with the v4 voice model.
- For example, “Hello! We’re here to discuss ONBOARDING!” will produce a different voiceover and, consequently, a different video than “Hello, we’re here to discuss onboarding.”
- Unexpected text may occasionally appear in your video. AI Avatars doesn’t support adding or controlling on-screen text, but the model can sometimes generate text. Based on what we’ve observed, this may appear more often when:
- Words or phrases in your script are emphasized with quotation marks or written in all caps.
- The character is positioned in the left or right third of the frame, leaving a large open space.
These results reflect how the model currently works. Prompt adjustments won't change them, but we're working to improve the experience.
FAQs
Does editing or duplicating an avatar video use credits?
No. It doesn’t consume additional credits to update the script, switch to another character, or duplicate the avatar video. However, regenerating the avatar video consumes additional credits.
Can I use the same character across Articulate 360 AI and Frontline?
Yes. Saved characters carry over to any Articulate product that supports AI Avatars.
Is AI Avatars available in other Articulate 360 AI formats or Frontline artifacts?
Not yet. AI Avatars is currently only available in a course, microlearning, or quick reference.
Does AI Avatars work with translated or localized courses?
Only the captions get translated; the narration stays in its original language.
Can I download an avatar video while on a trial subscription?
No, downloading is available only with paid subscriptions.
What if avatar video generation fails? Will it still cost credits?
Credits are only consumed when a generation completes successfully, so a failed generation doesn't use your credits.