
Browse Articles
Select a Product
null Support Directory
Browse all null articles. (Last Updated
No articles found.
Search Results
No articles found.
Storyline 360: Working with Triggers
Article Last Updated Jun 15, 2026
This article applies to:
When you want to build interactivity into your Storyline 360 courses but don’t want to spend your days coding, triggers are the answer. Triggers make your slides responsive to learner choices. Just pick an action and decide when it fires. Show a new layer when a learner clicks a button, jump to a different scene based on a quiz score, change a character’s pose based on the answer chosen in a scenario…your options are wide open! Keep reading to learn how to work with triggers.
- Understand the Triggers Panel
- Add Triggers
- Add and Manage Conditions
- Customize Triggers
- Organize Triggers
- Make Triggers Accessible
Understand the Triggers Panel
The Triggers panel is organized into sections based on when each trigger fires. Here’s what each section contains, in the order they appear in the panel.
- Slide Triggers: Rely on the slide or layer timeline and always appear at the top of the panel.
- Key-Press Triggers: Fire when the learner presses a specific key after clicking the slide or layer.
- Variable Triggers: Fire when a variable changes.
- Unassigned Triggers: Appear here if the "when" parameter is left blank, so you can quickly spot and fix incomplete triggers.
- Object Triggers: Apply to objects on the slide and fire when the learner performs an action.
- Player Triggers: Apply to the built-in Previous, Next, and Submit navigation buttons and always appear at the bottom of the panel.

Add Triggers
When you’re ready to get started adding triggers, remember that every trigger has two core elements:
- What action do you want to occur?
- When do you want it to happen?
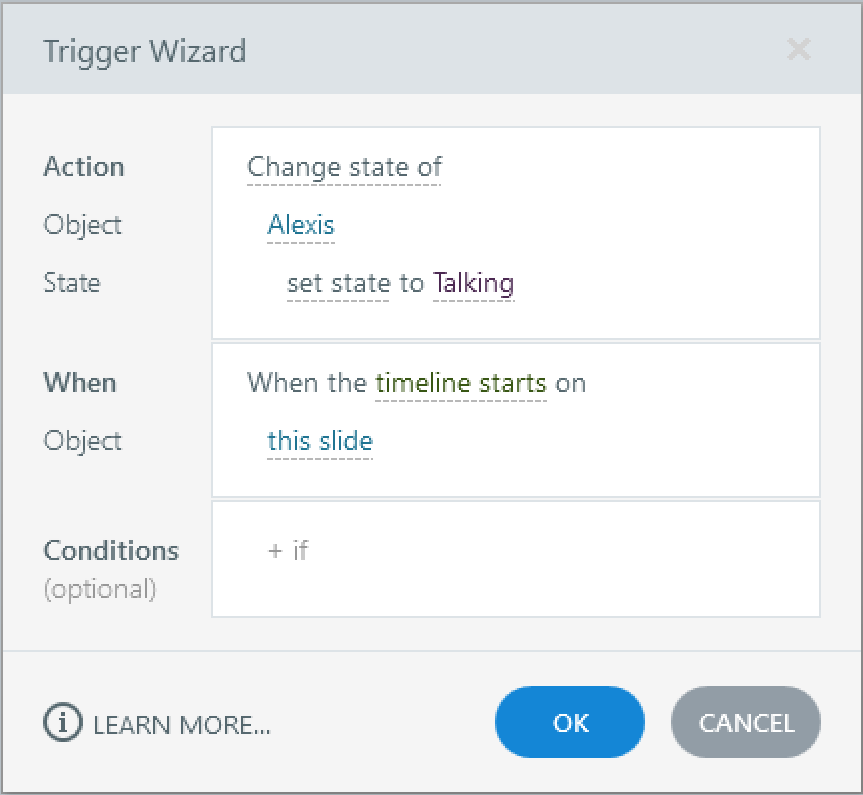
To create a trigger:
- Click the Create a new trigger button in the Triggers panel, or go to the Insert tab on the ribbon and click Trigger.
- Select the action you want to occur and fill in the related parameters.
- Choose when you want the action to happen and fill in the related parameters.
- Optional: Add conditions if you want the trigger to fire only in certain circumstances.
- Click OK to save your changes.
Add and Manage Conditions
If you want to specify the exact circumstances that must be met before a trigger activates, you can add conditions. Follow these steps:
- Double-click the trigger you want to edit in the Triggers panel to open the trigger wizard.
- Click the + if drop-down list next to the Conditions field. Conditions can be based on a variable, an object on the slide or any of its layers, or the window in which the slide is displayed.
- After selecting a variable, object, or window, click the underlined portions of the conditional sentence and make your selections from the drop-down lists. For example, you might want the trigger to fire only when the state of a button is not visited.
- Repeat to add as many conditions as you need. Then, choose how they interact: and (all conditions must be met), or (only one must be met), or a mix of both. Click and or or to toggle between them.
- Optional: Add an alternative action by clicking + Add Else. Storyline 360 adds a default "else" action based on your main action. Click it to change it if needed.
- Click OK to save your changes.
To reorder conditions, drag them up and down in the trigger wizard.
To duplicate a condition, hover over it and click the Duplicate Condition button that appears, then adjust the copy as needed.
To delete a condition, hover over it and click the Remove Condition button that appears.
Customize Triggers
To edit a trigger from the Triggers panel, click any underlined word or phrase and choose an option from the drop-down list or type a value. For more options, double-click the trigger or select it and click Edit the selected trigger button at the top of the Triggers panel to open the trigger wizard.
To disable a trigger, hover over it and click the Disable Trigger button (a lightning bolt with a slash). The trigger’s text appears crossed out so you can quickly tell it’s disabled. Click the button again to re-enable it. This process can be useful when you’re troubleshooting an interaction or testing ideas.
Note: Disabled triggers won’t work in the published output. Re-enable any triggers you need before publishing.
To copy and paste a trigger, select it in the Triggers panel, then press Ctrl+C or click the Copy the selected trigger button at the top of the panel. Then, select one or more objects on the slide where you want to paste it, and press Ctrl+V or click the Paste the copied trigger to the selected object button. You can edit the pasted trigger inline, or double-click it to open the trigger wizard.
To copy a trigger by duplicating an object, select the object on the slide and press Ctrl+D. This copies the object and all its triggers. That can be helpful when you need several variations of an object you’ve already set up—for example, if you need several buttons that look the same and perform similar actions.
To paste conditions across triggers, copy the trigger that has the conditions you want to reuse. Then select the trigger(s) where you want to paste the conditions, right-click the selected trigger(s), hover over Paste, and choose Paste Conditions.
To delete a trigger, select it in the Triggers panel, then do any of the following:
- Press the Delete key on your keyboard.
- Click the Delete the selected trigger button at the top of the Triggers panel.
- Right-click the trigger and select Delete.
Organize Triggers
To select multiple triggers at once, do any of the following:
- Click an object on the slide to select all triggers associated with it.
- In the grouped view, click a "When…" event to select all the triggers in that group
- Ctrl+click to select multiple triggers that aren’t next to each other.
- Shift+click the first and last triggers in a range to select everything in between.
- Press Ctrl+A to select all triggers in a section of the Triggers panel, such as Slide Triggers or Object Triggers.
To reorder triggers, use the Up and Down arrows at the top of the Triggers panel, or drag triggers up and down.
Note: Slide master triggers always fire before slide and layer triggers. If multiple triggers on the same object share the same event, they fire in the order they appear in the panel.
To group triggers by event, check the Group box at the top of the Triggers panel. This makes triggers easier to read and troubleshoot. Uncheck the box to ungroup the triggers.
Here’s a comparison of the same triggers, ungrouped on the left and grouped on the right.

To collapse or expand an object’s triggers, click the triangle to the left of the object. To collapse or expand an entire section, click the arrows to the right of the section header.
Make Triggers Accessible
Don’t forget about accessibility when using triggers. Ensure that the interactions you build respond correctly to keyboard input, provide meaningful feedback to screen reader users, and don’t create unexpected experiences for learners. Follow these tips to boost trigger accessibility:
- Inform learners about significant changes before they activate them. If a trigger opens a new window, submits a response, or causes another important change, let learners know what will happen before they activate it (3.2.2 On Input).
- Give learners control over navigation. Avoid automatically advancing to the next slide when possible so learners can interact with the content at their own pace (2.2.1 Timing Adjustable).
- Help learners find new content and feedback. When a trigger displays a layer, lightbox, result, or feedback message, make it easy for keyboard and screen reader users to discover the new content. When possible, move keyboard focus to the newly displayed content (2.4.3 Focus Order, 4.1.3 Status Message).
- Keep focus visible during interactions. When a trigger changes slide content or displays a new layer, make sure the currently focused element remains visible and isn’t covered by new content (2.4.7 Focus Visible, 2.4.11 Focus Not Obscured (Minimum)).
- Provide a keyboard-accessible way to close layers and lightboxes. When a trigger opens a layer or lightbox, provide a way to close it using the keyboard and return the focus to a logical place on the slide (2.1.2 No Keyboard Trap).
- Use keyboard-accessible objects for triggers. Make sure learners can reach and activate objects with triggers using only a keyboard. Avoid interactions that depend only on mouse actions, such as hovering (2.1.1 Keyboard).
- Test trigger interactions with a keyboard and screen reader. Confirm learners can reach and activate every object with a trigger attached using only the keyboard, and that important content changes are communicated to screen reader users. Learn more about navigating Storyline courses with a screen reader or keyboard (2.1.1 Keyboard).