
Browse Articles
Select a Product
null Support Directory
Browse all null articles. (Last Updated
No articles found.
Search Results
No articles found.
Reach 360: Modify Custom Domain Settings
Article Last Updated Jun 4, 2026
This article applies to:
You can already customize your subdomain in Reach 360, but what if you want to level up with a custom domain that you already own? If you know how to add records to your domain name system (DNS) provider and then point your Reach 360 account to the new address, you're ready to go. Once that's done, you can even have learner notifications come from your own custom email!
As soon as you’ve added the records to your DNS provider and everything is set up in Reach 360, traffic from your subdomain redirects to your new custom domain. Read on for detailed instructions.
Set Up a Custom Domain
A custom domain is one that you own and control, usually purchased through a domain registrar. To make your custom domain appear as the URL for Reach 360, you need access to the settings for your registered domain (usually via the site where it was purchased) as well as owner-level access to your Reach 360 settings.
Step 1: Creating a CNAME Record
To add a custom domain to your Reach 360 account, start by adding a CNAME record to your DNS records. This masks your Reach 360 site's name by pointing the subdomain to the custom domain you own.
Depending on whether you use a U.S. or EU data center for Reach 360, the CNAME record should follow this formula, including the dot after your hostname:
- U.S. Data Center:
your custom hostname. 60 IN CNAME custom.reach360.com. - EU Data Center:
your custom hostname. 60 IN CNAME custom.reach360.eu.
For example, if you wanted the hostname for your current Reach 360 site, glivy.reach360.com, to instead be learn.glivy.com, you would create a CNAME record in your DNS records that looked like this:
- U.S. Data Center:
learn.glivy.com. 60 IN CNAME custom.reach360.com. - EU Data Center:
learn.glivy.com. 60 IN CNAME custom.reach360.eu.
Note: In the examples above, the number is the TTL value. This controls the refresh rate. Its upper and lower limits are defined by your DNS provider. If 60 isn't an option, enter the lowest value available.
The steps to creating a CNAME for your site vary depending on the domain provider, but generally, you’ll need to add the CNAME directly to your DNS records. If you need additional assistance, contact the site where you registered your domain name.
You may also need to set up a Certification Authority Authorization (CAA) record to specify which certificate authorities (CAs) are allowed to issue certificates for the domain.
Note: Custom domain masking works only with web addresses that contain at least third-level domains. For example, https://learn.glivy.com and https://www.glivy.com are compatible, while https://glivy.com is not.
Step 2: Enter Your Domain Address
Once you’ve set up your CNAME record (and CAA record, if applicable), it’s time to make the switch! In Reach 360:
- Navigate to Manage > Settings.
- Under URL (visible to the primary admin only), click Manage Custom Domain.
- Select Use my own domain and enter your custom domain URL.
- Click Save Changes to complete the redirect from your current Reach 360 subdomain to your new custom domain. Once the custom domain is validated, everyone in your account is notified of the change via email.
If you want to return to your original subdomain after the redirect is complete, click Change and select Use a Reach 360 domain.
Note: If you wish to use a different custom domain URL after you've already set a custom domain, you must first switch back to your original subdomain before you make any DNS changes. Once you've switched to a Reach 360 subdomain, repeat the steps above.
Specify a Custom Email Address
After you've added a custom domain to your Reach 360 account, you can specify a custom return email address for learner invites and training notifications. This replaces the default Reach 360 email address. Here are a few things to note before you start:
- This email must use a subdomain of your custom domain.
- Custom emails always begin with
notifications-no-replyand end with your custom domain. You're only modifying the subdomain of the email address, the part directly after the@symbol. For example, if your custom domain islearn.glivy.com, your custom return email will look like this:notifications-no-reply@customvalue.learn.glivy.com.
Follow the steps below to get started.
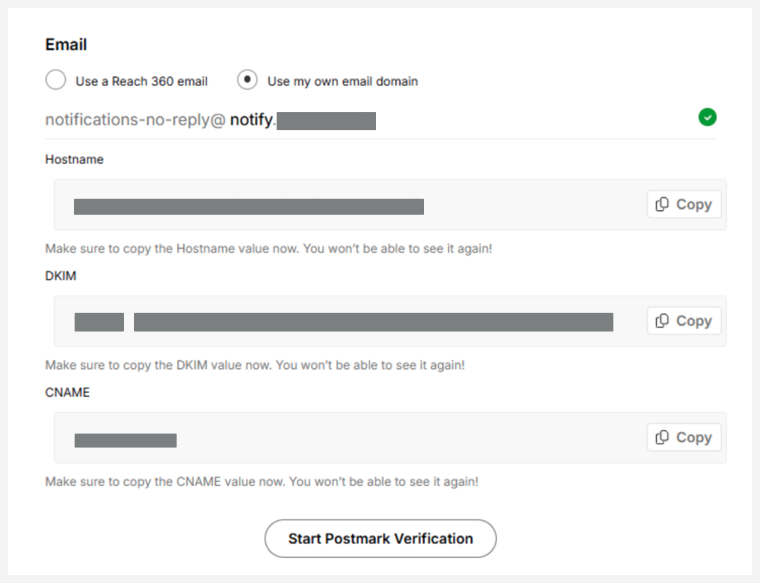
- Under Email, select Use my own email domain.
- Enter the subdomain value for your custom email address and click Save. This email must already be set up with your email hosting provider.
- Copy and save the Hostname, DKIM, and CNAME values when they display; you'll need them to create the proper records in your DNS in the next step. These values are displayed only until you refresh or navigate away from this page.
- Access your domain provider's DNS settings and create the following records. Note that your provider may present fields to enter each value when creating these records. In that case, simply enter the values you copied using the following formulas.
|
Host |
Type |
Value |
|---|---|---|
|
{{Hostname Value Provided}} |
TXT |
{{DKIM value provided}} |
|
{{custom email domain name after @ symbol}} |
CNAME |
{{CNAME value provided}} |
-
- TXT record with the Hostname and DKIM provided, using the following formula:
Hostname Value Provided 300 IN TXT DKIM Value Provided - CNAME record with the CNAME value provided and your new custom email domain
For example, if you were using a custom email value ofnotificationsfor yourlearn.glivy.comcustom domain, the record should look like this:notifications.learn.glivy.com CNAME CNAME Value Provided
- TXT record with the Hostname and DKIM provided, using the following formula:
- Once these records have been added to your DNS, return to Reach 360 and click Start Postmark Verification to begin the verification process. Note that the green checkmark doesn't indicate successful Postmark verification but confirmation that the email itself is valid for verification. Postmark verification can take up to 48 hours (but is often less). Check your inbox for confirmation that your custom email domain has been verified. If we're unable to verify your email address, you'll receive an email with additional information.
Until the email is verified, learner emails and training notifications will continue to be sent from your default Reach 360 email. If you remove or change your custom domain, your custom email reverts to the default Reach 360 address.
FAQs
What happens to my original Reach 360 subdomain when I use a custom domain?
Masking with a custom domain preserves your original subdomain (unlike when you change your subdomain). If you ever stop using your custom domain, your Reach 360 URL will revert to your original subdomain.
Will my custom email address remain if I stop using my custom domain?
Email notifications return to their default address if your custom domain is disabled.
If I change my custom email address, do I have to repeat the setup?
If you change or reactivate your custom email address, any records you created for your domain provider are invalidated. You must repeat the setup steps using the new values provided