
Browse Articles
Select a Product
null Support Directory
Browse all null articles. (Last Updated
No articles found.
Search Results
No articles found.
Storyline 360: Adding Result Slides
Article Last Updated Mar 3, 2026
This article applies to:
Want to give learners dynamic feedback at the end of quizzes and surveys? Need to transmit reporting and tracking information to a learning management system (LMS), including learners’ responses and scores? You can do both with result slides.
You can use multiple result slides in a Storyline 360 course and even combine them for a total score. This article walks you through the process of adding result slides and setting up their properties step by step.
- Add a Result Slide
- Choose a Quiz Type
- Identify the Questions to Be Tracked
- Enable the Quiz Timer (Optional)
- Name Your Quiz
- Define the Passing Score (for Graded Results)
- Score Only Viewed Questions (Optional)
- Round Quiz Scores (Optional)
- Choose Result Slide Features
- Format Result Slide Buttons
Step 1: Add a Result Slide
- First, do any of the following:
- Go to the Home tab on the ribbon, click New Slide, and choose Results.
- Go to the Slides tab on the ribbon and click Results.
- In Story View, right-click anywhere in the workspace, scroll to New Slide, and choose Results.
- In Slide View or Form View, right-click anywhere in the Scenes panel, scroll to New Slide, and choose Results.
- When the Insert Slide window appears, choose the type of result slide you want to add. Use the filters on the left side of the window to narrow your choices. There are four result-slide types:
- Graded: Tracks quiz scores. You can display the learner’s score, the passing score, and feedback on whether they passed or failed.
- Survey: Tracks responses to non-graded questions. You can collect learner feedback without assigning a score.
- Blank: Sends completion data to an LMS/LRS. You can design the slide from scratch, including a summary, thank-you, or standard content slide.
- Combined: Tracks multiple quiz results in one final slide. You can set it so that learners must pass all selected quizzes to pass the course.
Tip: Accessible-by-default templates appear at the top of the result slide gallery under Built-in Result Slides. Legacy and Content Library 360 templates are listed separately below.
- Click Insert Slide to add the result slide to your course.
The Quiz Settings window appears, as shown below, where you can name your quiz, enable the quiz timer, select the questions you want to track, set the passing score, and more.

Step 2: Choose a Quiz Type
Use the drop-down list in the upper left corner of the Quiz Settings window to choose one of these quiz types:
- Final Assessment: Creates a standard “submit results” trigger on the result slide. This is the default quiz type. A final assessment can be scored and tracked by your LMS/LRS, and it’s automatically added to your LMS/LRS tracking options.
- Pre-Check: Creates a conditional “submit results” trigger, which depends on the learner passing the quiz. A pre-check quiz can be scored and tracked by your LMS/LRS only if the learner passes. If they fail, the quiz won’t get reported to your LMS/LRS, and the learner has an opportunity to pass another quiz later in the course. Pre-checks are automatically added to your LMS/LRS tracking options. (Even though a failed pre-check doesn’t get reported, the question data still gets submitted to the LMS/LRS. Depending on your LMS/LRS, you might be able to see how a learner responded to a failed pre-check.)
- Knowledge Check: This quiz type isn’t scored or tracked by your LMS/LRS. Therefore, a “submit results” trigger isn’t created. A knowledge check allows learners to test their knowledge and reinforce what they learned.
Step 3: Identify the Questions to Be Tracked
A result slide can track question slides or other result slides. Use the Calculate results for drop-down list to select one of the following, then mark the boxes for the question slides or result slides you want to track.
- Questions: Tracks individual question slides and question draws.
- Result Slides: Combines multiple result slides into one final result slide. You choose how the quizzes are scored using the available scoring options:
- User must pass each quiz: Requires learners to pass each selected quiz. If they fail any quiz, they fail the entire course.
- Combine points from each quiz: Adds the points from all selected quizzes together as the final course score. Enter a percentage in the Combined Passing Score field at the bottom of the window. With this option, learners can fail one or more quizzes and still pass the course if their combined score meets the passing requirement.
Note: When combining multiple quizzes into a final result slide, learners must visit each individual result slide to complete the course. Otherwise, the course will be marked incomplete.
Step 4: Enable the Quiz Timer (Optional)
You can set a time limit for your quiz, using the options in the upper right corner of the Quiz Settings window.
- Mark the Quiz Timer box, then enter the number of minutes you want to allow for the quiz.
- Click the stopwatch icon to choose when the timer should start counting down and how you want it to display. (Note: The responsive mobile player always uses the time remaining format.)
Learners will see the quiz timer in the upper right corner of the player frame. In the modern player, you can hide the quiz timer by turning off the menus and controls. However, there’s no option to hide the quiz timer in the classic player.
Step 5: Name Your Quiz
You can assign unique names to quiz result slides, making it easy to identify the corresponding built-in variables for each quiz. For example, a quiz named Time_Management generates variables such as Time_Management.PassPercent and Time_Management.ScorePoints.
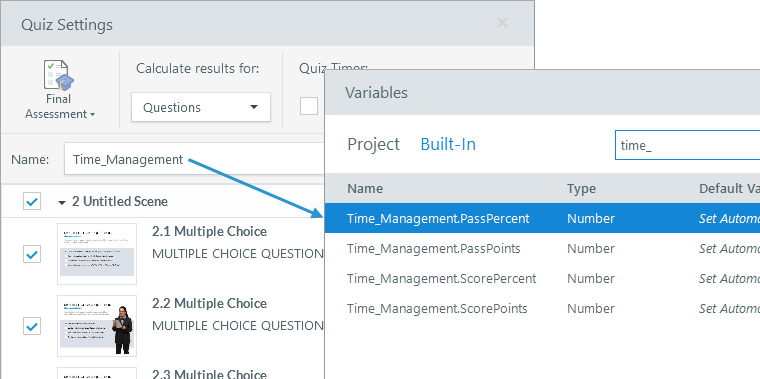
Use letters, numbers, and underscores to name your quizzes. Spaces, hyphens, and special characters aren’t allowed. Quiz names won’t show in your published course. They’re only visible in your project file.
Step 6: Define the Passing Score (for Graded Quizzes)
If you’re tracking graded questions, enter a percentage in the Passing Score field at the bottom of the Quiz Settings window.
Step 7: Score Only Viewed Questions (Optional)
You can allow learners to skip quiz questions without negatively affecting their score by grading only the questions they view. Mark the box to Only score viewed questions.
For example, you might branch learners to different questions based on their answers to previous questions, which means they could skip some questions along the way.
Unviewed questions and unanswered questions are treated differently. When you score only the questions learners view, they won’t be penalized for questions they don’t see. However, if learners visit questions and then skip them without answering, those questions will count against their quiz score.
Step 8: Round Quiz Scores (Optional)
By default, Storyline 360 displays quiz score percentages with decimal points—for example, 94.78%. The exact score appears on the result slide and is sent to your LMS/LRS. You can round the score to the nearest whole number by marking the Round score percentage box.
The related built-in variable, [QuizName].ScorePercent, reflects the exact or rounded value based on your selection.
Step 9: Choose Result Slide Features
You can choose the features you want to display on your result slide. Here’s how:
If the Quiz Settings window is open, click OK to close it, then go to the Result Tools—Design tab on the ribbon. Select a feature and click the slide where you want it to appear.
You can add features to the base layer or to the success/failure layers. For example:
- Add a review button to the base layer so learners can review the quiz whether they pass or fail.
- Add a print button to the success layer so learners who pass can print their results.
- Add a retry button to the failure layer so learners can retake the quiz.
The following features display in a text box that can be formatted to your preference:
- Passing Percent: Displays the percentage required to pass.
- User Percent: Displays the percentage the learner achieved.
- Passing Points: Displays the number of points required to pass.
- User Points: Displays the number of points the learner earned.
The following features display as buttons:
- Review Button: Lets learners review submitted answers but not change them.
To give learners feedback, double-click the Review results trigger in the Triggers panel and maark the Show correct/incorrect responses when reviewing box. To let learners review only incorrect questions, mark the Review only incorrect questions box.
The review button isn’t available for combined result slides. - Print Button: Lets learners print a summary of their results.
To include the learner’s name, double-click the Print results trigger in the Triggers panel and mark the Prompt the user for their name box.
Learners can choose Save as PDF from the printer’s Destination list to create a searchable PDF. - Retry Button: Gives learners an unlimited number of attempts to retake the quiz. (Follow these steps if you need to limit the number of attempts.)
If the quiz draws from a question bank, learners see a different subset of questions each time.
To let learners retry only the questions they got wrong, double-click the Reset results trigger in the Triggers panel and mark the Reset only incorrect questions box.
The retry button isn’t available for combined result slides.
Step 10: Format Result Slide Buttons
You can format buttons on your result slide to match the rest of your course design. Select a button on your slide, go to the Button Tools—Format tab on the ribbon, and make your design selections.
You can add icons, change the button style, adjust the colors, and add effects. To learn more about working with buttons, read this user guide.